


Why Cleaning AC Condenser Coils Between Professional Visits Saves You Money
Knowing how to clean AC condenser coils between professional visits is one of the highest-return maintenance habits a homeowner can build. Dirty condenser coils force your system to work harder, and according to industry data, that extra strain can reduce your AC’s efficiency by 20 to 30 percent — pushing your energy bills noticeably higher every month you let the buildup sit.
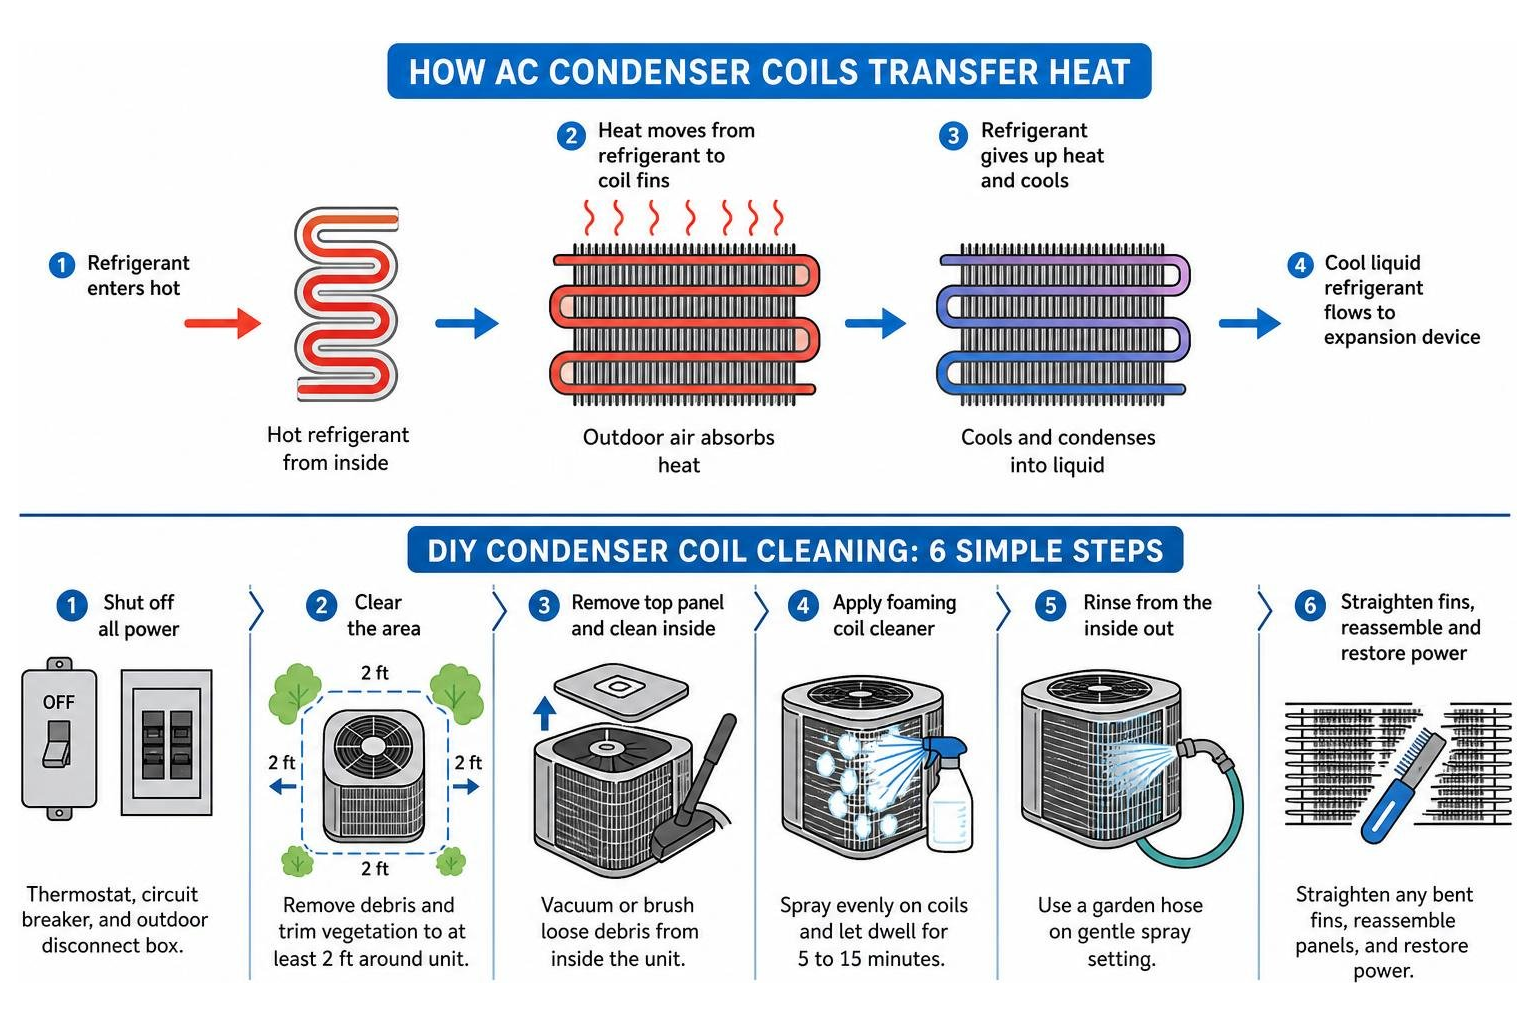
Here is a quick overview of how to do it safely:
- Shut off all power at the thermostat, circuit breaker, and outdoor disconnect box.
- Clear the area by removing debris and trimming vegetation to at least 2 feet around the unit.
- Remove the top panel and vacuum or brush loose debris from inside the unit.
- Apply a foaming coil cleaner and let it dwell for 5 to 15 minutes.
- Rinse from the inside out using a garden hose on a gentle spray setting.
- Straighten any bent fins with a fin comb, then reassemble and restore power.
Most homeowners can complete this in under an hour, once or twice a year. The sections below walk through each step in detail, cover the tools you need, and explain which common mistakes can cause real damage to your system.
Understanding Your AC Coils: Evaporator vs. Condenser
To take care of your air conditioning system, it helps to understand how it keeps you cool during those humid southern Ontario summers. Your central air conditioner is essentially a heat transfer system. It does not actually “create” cold air; instead, it extracts heat from inside your home and dumps it outdoors.
This process relies on two distinct types of coils working in perfect harmony:
- Evaporator Coils (Indoor): Located inside your home (typically mounted on top of your furnace or inside your air handler), these coils are filled with cold refrigerant. As warm indoor air blows across them, the refrigerant absorbs the heat and moisture, lowering your indoor temperature and improving indoor air quality.
- Condenser Coils (Outdoor): Located in your outdoor unit, these coils receive the hot, pressurized refrigerant from inside. The outdoor fan blows air across the condenser coils, releasing the collected heat into the outdoor air.
When dirt, dust, and grime build up on either of these coils, they act as an insulating blanket. This barrier blocks the essential heat exchange process, forcing your compressor to run longer and hotter. If you are experiencing issues where your system struggles to keep up, you can read our guide on How to Fix Dirty Condenser Coils in Chicago to understand how dirty coils impact the refrigeration cycle.
Why Evaporator Coils Are Best Left to Professionals
While cleaning your outdoor coils is a fantastic weekend project, we strongly advise against attempting to clean your indoor evaporator coils yourself.
The indoor evaporator coil is highly delicate and difficult to access. It is housed inside your home’s ductwork, often sealed behind metal panels. Accessing it requires opening the air handler, which exposes sensitive electrical controls and the system’s blower motor.
Furthermore, evaporator coils sit directly above shallow residential drain pans that are often only an inch deep. If you spray water or chemical cleaners inside, you risk overflowing the pan and causing extensive water damage to your drywall, ceiling, and nearby electronics.
Improper handling can also lead to mold growth in your ductwork, disrupt the system’s static pressure, and void your manufacturer’s warranty.
Why You Should Learn How to Clean AC Condenser Coils Between Professional Visits
Your outdoor condenser unit is on the front lines of the elements. Throughout the spring and summer in communities like Hamilton, Burlington, and Oakville, your outdoor unit acts like a giant vacuum cleaner. It pulls in everything floating in the air: grass clippings, pollen, dandelion seeds, dirt, and fallen leaves.
This constant accumulation of yard debris creates a thick mat over the delicate aluminum fins, resulting in severe airflow restriction. Fortunately, because the condenser unit sits safely outside, you can easily access the outer cabinet to perform light maintenance.
Learning how to clean AC condenser coils between professional visits keeps the path clear for heat to escape, ensuring your system runs smoothly. For more ideas on maximizing your comfort, check out our 5 Tips to Get the Most Out of Your Air Conditioner.
The Ultimate Guide on How to Clean AC Condenser Coils Between Professional Visits

Maintaining your outdoor unit does not require a background in mechanical engineering. With a little patience and the right tools, you can easily keep your condenser clean and clear.
For the best results, we recommend performing a light rinse every month or two during the high-use summer season, and a more thorough cleaning once a year in the spring before you turn the system on for the first time.
If you are wondering how this fits into your overall home maintenance schedule, take a look at our guide on How Often Do I Need an AC Unit Tune Up.
Essential Tools and Safe Cleaning Products to Use
Before you begin, gather the following tools to ensure the job goes smoothly and safely:
- Safety Gear: Work gloves and safety glasses to protect your hands and eyes from sharp metal fins and cleaning chemicals.
- Screwdriver or Nut Driver: Usually a 5/16-inch driver to remove the screws holding the top panel or protective cage.
- Shop Vacuum: Equipped with a soft brush attachment to safely remove loose leaves, cobwebs, and dirt.
- Foaming Coil Cleaner: A specialized, non-acidic foaming cleaner designed specifically for outdoor condenser coils.
- Garden Hose: With a standard spray nozzle (adjustable to a gentle shower or fan setting).
- Fin Comb: A small, inexpensive tool used to gently straighten bent aluminum fins.
Common Household Items and Tools to Avoid
Using the wrong tools or chemicals can ruin your air conditioner in minutes. Never use the following items on your AC coils:
- Pressure Washers: The high-pressure stream from a pressure washer will instantly flatten and destroy the delicate aluminum fins, permanently blocking airflow and requiring a costly coil replacement.
- Bleach or Acidic Cleaners: Bleach and highly acidic cleaners are incredibly corrosive to aluminum and copper. They can eat away at the metal, causing refrigerant leaks and destroying the solder joints.
- Vinegar: While vinegar is a great household cleaner, its acetic acid content can corrode copper over time, leading to micro-leaks.
- Stiff Wire Brushes: Brushing across the fins with a stiff wire brush will bend the aluminum and scratch the copper tubing.
Step-by-Step DIY Condenser Coil Cleaning Process
Safety is the absolute priority when working on any electrical appliance. Follow these steps carefully to clean your condenser coils without risking injury or system damage.
By keeping your coils clean, you will actively Boost Your AC Efficiency and keep your home cool and comfortable.
Step 1: Power Down and Prep the Area
Never work on an air conditioner while it has power running to it. Even if the system is not actively running, high-voltage components and capacitors carry enough electrical charge to cause severe injury.
- Turn off the system at the thermostat: Set your thermostat to “Off.”
- Shut off the outdoor disconnect: Locate the metal disconnect box mounted on the wall near your outdoor unit. Open the cover and pull the plug out, or flip the switch to the “Off” position.
- Turn off the circuit breaker: For absolute safety, go to your main electrical panel indoors and switch off the breaker labeled for your air conditioner.
- Clear vegetation: Trim back any bushes, grass, weeds, or flowers to ensure there is at least 2 feet of clear space on all sides of the unit, and 5 feet of clear space above it. This ensures proper airflow.
Step 2: Remove Debris and Apply Cleaner
With the power completely cut, you can safely open the unit to clean out the debris that has settled inside.
- Remove the top panel: Use your screwdriver or nut driver to remove the screws securing the top grille. Carefully lift the top panel—which houses the fan motor—and set it aside. Be careful not to strain or pull the electrical wires connected to the fan motor. You can support the motor assembly by resting it on a piece of wood slipped through the grille.
- Vacuum the base pan: Leaves, dirt, and sometimes even small pests can accumulate in the bottom of your unit, clogging the drainage holes. Use your shop vac to clean out this debris completely.
- Apply the coil cleaner: Shake your can of foaming coil cleaner. Spray the cleaner onto the coils, working from the bottom up in a side-to-side motion. Make sure to coat the coils evenly.
- Let it dwell: Allow the foam to sit for 5 to 15 minutes (or as directed on the product label). As the foam expands, it will actively liquefy and push dirt, grease, and pollen out from between the tight fins.
Step 3: Rinse and Straighten the Fins
Now it is time to wash away the grime and restore the shape of your condenser’s fins.
- Rinse from the inside out: This is the most crucial part of the process. Position your garden hose inside the empty cabinet and spray outward through the coils. Rinsing from the inside out pushes the dirt out the way it came in, rather than packing it deeper into the fins. Use a gentle shower or fan setting on your nozzle.
- Flush the base pan: Rinse any remaining dirt and cleaner out through the drainage holes at the bottom of the unit.
- Straighten bent fins: Inspect the aluminum fins. If you see areas that have been bent or flattened by hail, lawnmowers, or accidental impacts, use your fin comb. Select the side of the comb that matches your unit’s fins-per-inch count, insert it gently at an undamaged section, and slide it vertically to straighten the bent sections.
- Reassemble and dry: Carefully place the top fan panel back onto the unit and secure it with the screws. Let the unit dry completely for 30 to 60 minutes.
- Restore power: Switch the circuit breaker back on, plug in or flip the outdoor disconnect switch, and set your indoor thermostat back to “Cool.”
Common DIY Mistakes That Can Damage Your AC Coils
While cleaning your condenser is a straightforward process, a few simple mistakes can lead to major headaches, voided warranties, or system failures. If you run into any issues during this process, or if you notice your system acting up afterward, read about the Signs Your AC Needs Immediate Repair.
Spraying Debris Deeper into the Unit
Many homeowners make the mistake of standing outside the unit and spraying their garden hose directly at the outer face of the coils.
Because the fan pulls air (and dirt) from the outside in, spraying from the outside only packs the dirt deeper into the middle of the coil. This creates a dense, hidden clog that is incredibly difficult to remove and severely restricts airflow.
This is especially dangerous for modern microchannel coils, which have incredibly tiny passages that clog easily. Always take the extra few minutes to remove the top panel and spray from the inside out.
Cleaning Hot Coils and Flash-Drying
Never apply chemical coil cleaners to a unit that has been running in the baking midday sun. If the metal coils are hot, the cleaning solution will flash-dry instantly.
This leaves a sticky, chemical residue baked onto the metal surfaces that acts like a magnet for future dust and pollen.
Additionally, spraying cold water onto extremely hot metal coils can cause sudden thermal shock, warping the delicate aluminum fins or cracking the copper joints. Plan your cleaning for a cool morning or evening when the unit has been off for a while.
The Long-Term Benefits of Regular Coil Maintenance
Taking the time to maintain your outdoor unit pays massive dividends over the years. It is the cheapest insurance policy you can buy to ensure reliable home comfort.
For a deeper look at keeping your system in peak condition, explore our guide on Prolonging AC System Lifespan.
Lower Energy Bills and Restored Efficiency
When your condenser coils are clean, heat transfers quickly and easily from the refrigerant to the outdoor air. This means your air conditioner can cool your home in shorter cycles, significantly reducing your electricity usage.
Over a single cooling season, keeping your coils clean can reduce your cooling costs by 5 to 15 percent. To learn more about optimizing your system’s performance, see our article on How to Help Your Air Conditioner Run More Efficiently.
Preventing Costly Compressor Failures
The compressor is the heart of your air conditioning system. When coils are caked in dirt, the compressor must work under incredibly high head pressure and extreme temperatures to pump refrigerant.
This chronic strain leads to overheating, electrical shorts, and eventual compressor failure.
Because replacing a compressor is one of the most expensive repairs an HVAC system can face, routine cleaning is the best way to protect your investment. Read more about the Benefits of Regular AC Maintenance.
Frequently Asked Questions About AC Coil Maintenance
To help you keep your cooling system running perfectly, we have compiled a quick comparison of the two coil types:
| Feature | Evaporator Coil (Indoor) | Condenser Coil (Outdoor) |
|---|---|---|
| Location | Inside the furnace/air handler | Inside the outdoor cabinet |
| Function | Absorbs indoor heat and humidity | Releases heat to the outdoor air |
| Primary Debris | Household dust, pet dander, mold | Grass, pollen, leaves, dirt |
| Cleaning Method | Professional deep clean only | DIY gentle rinse & foaming spray |
Can I use a garden hose to clean AC condenser coils between professional visits?
Yes, a standard garden hose is the absolute best tool for rinsing your outdoor condenser coils. However, you must use a gentle spray setting like “shower” or “fan.”
Never use a high-pressure nozzle or jet setting, and never use a pressure washer, as the force will bend the aluminum fins. Be sure to avoid spraying water directly into the electrical control box or the fan motor wiring.
What happens if I accidentally bend the aluminum fins?
If you accidentally bend a few fins while cleaning, do not panic. A small number of bent fins will not destroy your system, but they will restrict airflow in that specific area.
You can easily fix this by purchasing an inexpensive fin comb from a local hardware store. Simply match the comb to your fin spacing and gently brush upward to restore the airflow paths.
Should I cover my outdoor AC unit during the winter?
We generally do not recommend using full, solid plastic covers over your outdoor unit during our Canadian winters. Solid covers trap moisture inside the cabinet, creating a humid environment that accelerates rust, corrosion, and electrical damage.
Instead, place a simple piece of plywood on the top of the unit secured with a brick to protect it from falling icicles and heavy snow, leaving the sides open for ventilation.
If you use a heat pump year-round, never cover it, as it needs to breathe to heat your home in the winter. For more winter tips, read How Often Should a Heat Pump Be Serviced in Canada or check out our guide on How To Maintain a Ductless Mini Split in Canadian Winters.
Conclusion
Mastering the art of cleaning your AC condenser coils between professional visits is a simple, rewarding way to keep your home comfortable, lower your energy bills, and protect your system from unexpected breakdowns.
While these DIY steps are perfect for routine upkeep, they do not replace the deep, comprehensive care that comes with a professional tune-up.
As a trusted, family-owned HVAC company serving Hamilton, Burlington, Oakville, Stoney Creek, Grimsby, and the surrounding areas, we are always here to help. Our expert technicians perform thorough multi-point inspections, check refrigerant levels, test electrical components, and deep-clean your system safely to keep it running at peak performance all summer long.
Ready to schedule your seasonal maintenance? Visit our B & G Heating Services and Products Page to book your appointment today!