


What to Check Before Calling an AC Repair Technician in Hamilton
When it comes to ac troubleshooting before calling a pro, most cooling failures in Hamilton homes come down to a short checklist of simple, fixable issues you can work through in under 30 minutes. Over 80% of AC breakdowns are caused by preventable problems — and roughly seven out of ten service calls trace back to a dirty filter, a tripped breaker, or a wrong thermostat setting.
Before you book a service call, run through these basic checks first:
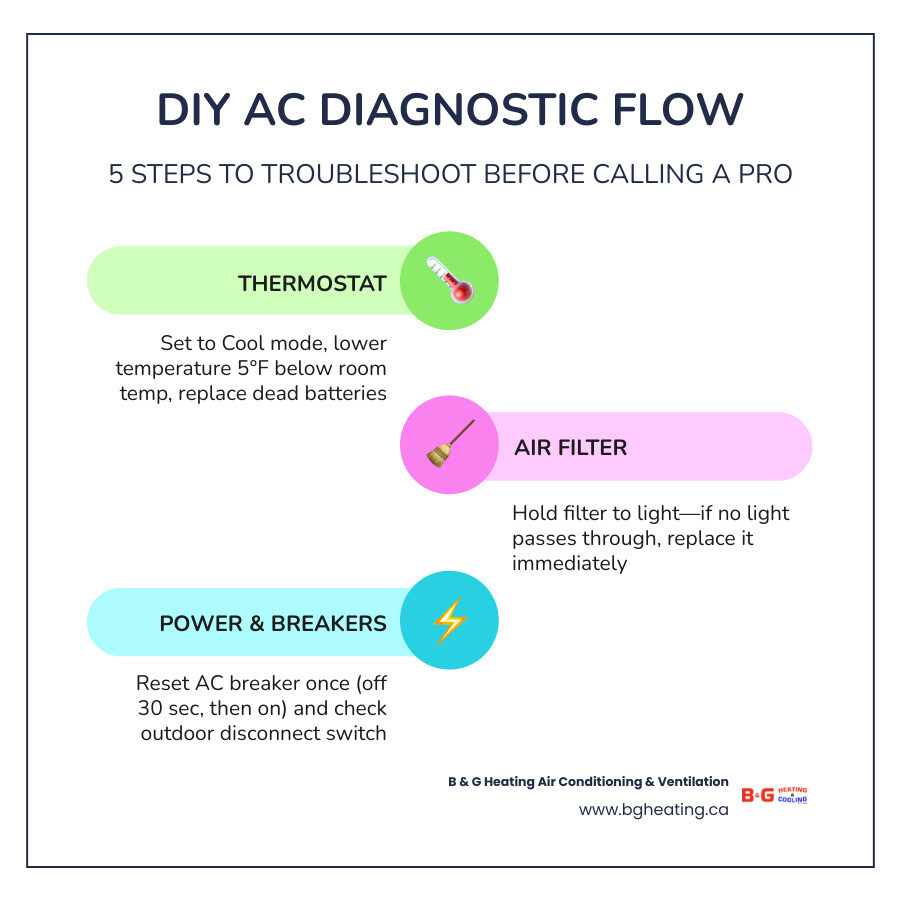
- Check your thermostat — confirm it’s set to Cool mode, the temperature is at least 5°F below room temperature, and the batteries aren’t dead
- Inspect your air filter — hold it up to a light source; if no light passes through, replace it immediately
- Reset your circuit breaker — locate the AC breaker in your electrical panel, flip it fully off for 30 seconds, then back on (do this once only)
- Check the outdoor disconnect switch — make sure it hasn’t been accidentally switched off during yard work or home repairs
- Clear vents and the outdoor unit — remove any furniture blocking registers and clear debris from around the condenser
These five steps alone resolve the majority of residential cooling complaints. If your system still isn’t working after running through them, that’s when a licensed HVAC technician needs to step in.
Hamilton summers bring real heat and humidity, and a system that goes down at the wrong moment can go from uncomfortable to urgent very quickly. The good news is that most of what looks like a serious breakdown is actually a simple fix hiding in plain sight.
Ac troubleshooting before calling a pro terms explained:
Essential AC Troubleshooting Before Calling a Pro

When your air conditioner suddenly stops blowing cold air or refuses to turn on at all during a muggy July afternoon in Hamilton, your first instinct might be to call us immediately. While we are always ready to help our neighbors in Ancaster, Burlington, and Stoney Creek, we also want to save you time and unnecessary hassle.
Many common air conditioning issues are not actually mechanical breakdowns. Instead, they are system shutdowns triggered by built-in safety mechanisms or simple power supply interruptions. Modern cooling systems are designed with protective controls that shut down the compressor or the indoor blower fan to prevent severe damage when something minor goes wrong.
Before assuming you need a major repair, it is crucial to perform a structured diagnostic walk-through. This systematic approach ensures you do not overlook a simple, free fix. If you want to dive deeper into the overarching philosophy of diagnosing your system, you can read our comprehensive guide on How Do You Troubleshoot an AC Problem? to build your DIY confidence.
Thermostat Checks and AC Troubleshooting Before Calling a Pro
The thermostat is the brain of your entire HVAC system. If the brain is confused, the rest of the body will not function. Roughly one-third of all service calls are resolved by simply correcting a thermostat setting or replacing dead batteries.
Start by verifying the following:
- The System Mode: Ensure the thermostat is set to “Cool.” It sounds incredibly obvious, but it is remarkably easy for a child, a guest, or a stray elbow to accidentally bump the switch into “Heat” or “Fan Only” mode.
- The Temperature Set Point: The programmed temperature must be set at least 5°F (about 3°C) below the current indoor room temperature. If the thermostat reads 74°F and is set to 73°F, the system may delay turning on. Lowering it significantly for testing purposes guarantees a call for cooling.
- The Power Source: Is the screen blank or dim? If so, replace the batteries immediately. Even if your thermostat is wired to your home’s electrical system, many models use backup batteries that can cause erratic behavior or completely shut down the control board when they die.
- Dust and Dirt Accumulation: Over time, household dust can settle inside the thermostat housing, coating the sensitive temperature sensors. Carefully pop the cover off and use a can of compressed air to blow away any debris.
If you are using a ductless mini-split or a system controlled by a remote and find that the unit is completely unresponsive, the issue might lie entirely within the handheld controller. If this sounds like your situation, read our guide on what to do when your AC Remote Control Stopped Working to troubleshoot your controller before looking at the larger system.
Power Supply and Circuit Breaker Resets
Central air conditioners are high-draw electrical appliances that run on two separate circuits: one for the indoor furnace or air handler, and another for the outdoor condenser unit. This dual-circuit design explains why your indoor fan might be happily blowing warm air while the outdoor compressor remains completely silent.
If your system is unresponsive, you must check both power sources:
- The Indoor Power Switch: Located near your furnace or air handler (often in the basement, utility closet, or attic), this switch looks exactly like a standard light switch. It is easily bumped or flipped off by accident during routine cleaning or storage rearrangements. Ensure it is switched to “ON.”
- The Main Electrical Panel: Open your home’s breaker panel and look for switches labeled “AC,” “Air Conditioner,” or “HVAC.” A power surge during a summer thunderstorm in Burlington or a sudden spike in local grid demand can trip these breakers.
- The Outdoor Disconnect Box: Mounted on the exterior wall of your home near the condenser unit, this metal box contains a switch, a pull-out plug, or slow-blow fuses. Make sure the switch is in the “ON” position. If your system uses physical fuses in this box, they may have blown during a power surge and will need to be replaced with slow-blow fuses of the exact same amperage.
If you find a tripped breaker in your main panel, perform a single reset: flip the breaker completely to the “OFF” position, wait 30 seconds to allow any residual electrical charges to dissipate, and then flip it firmly back to “ON.”
Safety Warning: If the breaker immediately trips again, do not reset it a second time. A breaker that trips repeatedly is doing its job to prevent an electrical fire. It indicates a severe electrical short, a failed capacitor, or a seizing compressor motor that requires immediate professional attention. For a step-by-step breakdown of power-related issues, consult our guide on how to Fix AC That Won’t Turn On.
Restoring Airflow and System Efficiency
Air conditioning is not actually about creating cold air; it is about transferring heat. Your system pulls warm air from inside your home, passes it over a freezing evaporator coil to extract heat and moisture, and then blows the cooled air back into your living spaces.
If anything restricts this continuous loop of moving air, the entire cooling cycle collapses. Restricted airflow places immense strain on your system’s blower motor and compressor, driving up your energy bills and ultimately causing safety switches to shut the system down. To learn more about identifying these underlying system bottlenecks, check out our resource on Identifying Common AC Issues.
Inspecting and Replacing Dirty Air Filters
A dirty air filter is the number one cause of air conditioning issues and is responsible for roughly 25% of all sudden system failures. When a filter becomes clogged with dust, pet dander, and airborne particles, it behaves like a thick wool blanket draped over your system’s lungs.
To determine if your filter is the culprit, perform the simple light test: Remove the filter from its slot and hold it up to a bright overhead light or window. If you cannot see light passing through the fibers, the filter is completely clogged and must be replaced.
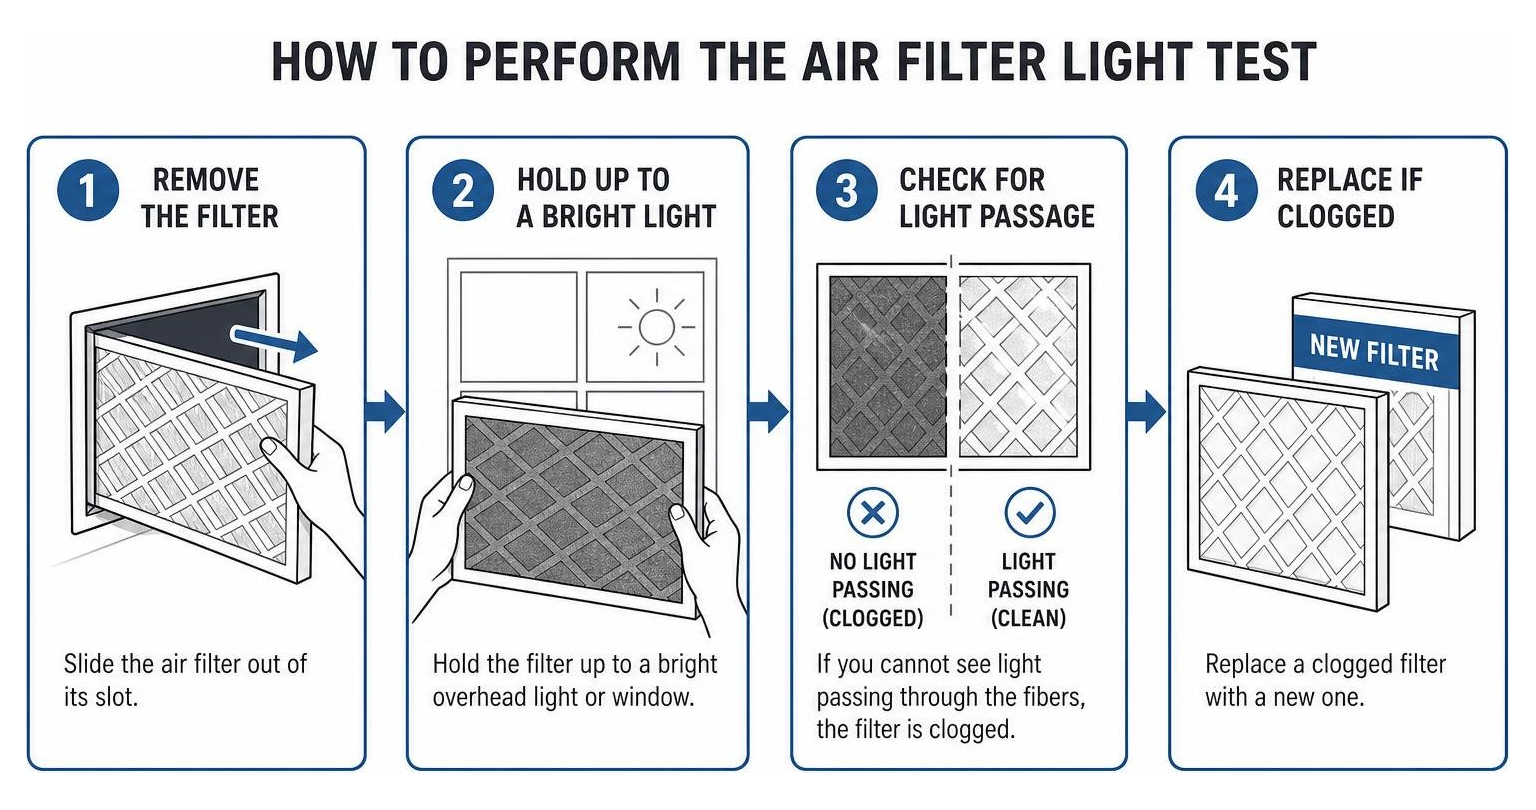
Replacing a clogged filter with a fresh one can lower your air conditioner’s energy consumption by up to 15%. However, when buying a replacement, do not automatically assume that a higher MERV (Minimum Efficiency Reporting Value) rating is better. Standard residential systems are designed for MERV 8 to 11 filters. High-efficiency filters rated MERV 13 or above can restrict airflow in older systems, starving the blower motor and causing the indoor coils to freeze.
Clearing Blocked Vents and Registers
To maintain proper static pressure throughout your home’s ductwork, your air conditioner relies on an unobstructed loop of supply and return vents. A common mistake homeowners make is closing vents in unused rooms to “save energy” or rearranging furniture over the summer without noticing they have blocked a major return air grille.
Closing supply registers does not save energy; instead, it increases pressure inside the ductwork, which can lead to leaks, strain the blower motor, and cause the indoor evaporator coil to freeze due to reduced airflow.
- Walk through your home and ensure all supply vents and return grilles are completely open.
- Maintain at least a two-foot clearance around all vents, keeping them free of heavy drapes, rugs, and furniture.
- Vacuum away any visible dust or pet hair accumulation on the grilles to keep the air moving freely.
Outdoor Condenser and Drainage Maintenance
The outdoor portion of your central air conditioning system is called the condenser. Its job is to release the heat that was extracted from inside your home. Because it lives outdoors, it is constantly exposed to the elements, making regular homeowner maintenance essential for keeping it running smoothly.
Cleaning the Outdoor Condenser Unit
For your outdoor unit to shed heat efficiently, it needs a continuous supply of fresh air. Over the spring and summer months, cottonwood seeds, grass clippings, fallen leaves, and dirt can collect on the delicate metal fins of the condenser, forming an insulating barrier that traps heat inside.
To clean and maintain your outdoor unit safely:
- Shut off the power: Turn off the system at the thermostat and flip the outdoor disconnect switch to “OFF.”
- Clear the perimeter: Trim back any shrubs, weeds, or overhanging branches to maintain a minimum of two feet of clear space around the sides of the unit, and five feet of clearance above it.
- Remove loose debris: Gently brush away leaves, twigs, and grass from the exterior grilles.
- Rinse the coils: Using a standard garden hose with a gentle spray nozzle, rinse the metal fins from the inside out to wash away trapped dirt.
Crucial Warning: Never use a pressure washer to clean your condenser coils. The high-pressure stream will instantly bend and crush the soft aluminum fins, permanently restricting airflow and causing severe, costly damage to your system.
Unclogging the Condensate Drain Line
As your air conditioner cools your home, it also dehumidifies the air. The moisture that condenses on the cold indoor evaporator coil drips down into a drain pan and flows outside through a small PVC pipe called the condensate drain line.
Because this line carries warm, damp water, it is a prime breeding ground for algae, mold, and mildew. Over time, a thick sludge can form, completely blocking the line. When this happens, the water backs up into the indoor drain pan.
Modern air conditioning systems are equipped with a safety float switch inside the drain pan. If the water level rises too high, the float switch trips, instantly cutting power to the outdoor unit to prevent water damage to your home’s ceilings and floors.
If your system has shut down and you suspect a clogged drain line:
- Locate the drain line exit: This is usually a small PVC pipe sticking out of your home’s exterior wall near the outdoor condenser.
- Use a wet-dry vacuum: Fit the hose of a wet-dry utility vacuum over the end of the PVC pipe. Wrap a rag around the connection to create a tight seal, and run the vacuum for 2 to 3 minutes to suck out any built-in algae clogs and standing water.
- Preventative maintenance: Every few months during the cooling season, pour a quarter-cup of plain white vinegar down the condensate drain access port located near your indoor air handler. This simple step kills algae before it can form a clog.
Handling Frozen Evaporator Coils Safely
If you notice that your air conditioner is running constantly but the air coming out of your vents feels warm, or if you spot ice forming on the copper refrigerant lines leading to your outdoor unit, you are dealing with a frozen evaporator coil.
A frozen coil is a symptom of a deeper issue, typically caused by restricted airflow (such as a severely dirty filter or blocked vents) or low refrigerant levels. To understand the mechanics behind this issue, read our guide on Troubleshooting Frozen AC Unit.
Thawing Coils and AC Troubleshooting Before Calling a Pro
If your evaporator coil is encased in ice, your air conditioner cannot transfer heat. Running the system in this state will place immense stress on the compressor, potentially leading to a complete system burnout. You must thaw the system safely before any further diagnostics or repairs can take place.
Follow this safe thawing procedure:
- Turn off the cooling: Set your thermostat mode to “OFF” immediately.
- Turn on the fan: Switch your thermostat’s fan setting from “AUTO” to “ON.” This forces the indoor blower fan to run continuously, pulling warm household air over the frozen indoor coil to melt the ice safely.
- Wait it out: Allow the system to run in fan-only mode for 2 to 4 hours. Do not attempt to speed up the process by using a hair dryer, space heater, or sharp tools to scrape the ice off, as you risk puncturing the delicate aluminum fins or copper refrigerant lines.
- Monitor the drainage: Keep an eye on your condensate drain pan. As the ice melts, a large volume of water will flow through the drain line. Ensure the water is draining properly and not overflowing onto your floor.
Once the coil is completely thawed, replace your air filter with a fresh one and try running the system in “Cool” mode again. If the coils freeze up a second time, you likely have a refrigerant leak, which requires a licensed technician to locate and repair.
When to Stop DIY and Call an HVAC Expert
While we encourage homeowners to handle basic maintenance and simple troubleshooting, it is vital to know your limits. Air conditioning systems combine high-voltage electricity, complex mechanical parts, and pressurized chemical refrigerants. Attempting to repair these components yourself can result in severe personal injury, voided equipment warranties, or permanent damage to your system.
By federal and provincial law in Ontario, any work involving the handling of chemical refrigerants requires EPA and provincial certification. Homeowners cannot legally purchase or add refrigerant to their own systems.
To help you decide when to keep troubleshooting and when to pick up the phone, refer to this quick reference table:
| DIY-Safe Troubleshooting Checks | Professional-Only HVAC Repairs |
|---|---|
| Replacing standard air filters | Locating and repairing refrigerant leaks |
| Resetting a tripped circuit breaker (once) | Replacing failed start/run capacitors |
| Cleaning dust and debris from the thermostat | Replacing a seized compressor or fan motor |
| Clearing leaves and brush from the outdoor unit | Diagnosing and repairing complex control board wiring |
| Flushing the condensate drain line with vinegar | Cleaning deeply packed indoor evaporator coils |
| Verifying and reprogramming thermostat settings | Repairing or sealing damaged, leaking ductwork |
Recognizing Serious Mechanical and Electrical Failures
If you encounter any of the following warning signs during your diagnostic walk-through, stop troubleshooting immediately, turn off power to the system, and call us for professional service:
- A Humming Outdoor Unit with a Still Fan: If you hear a loud humming noise coming from your outdoor condenser but the fan blade is not spinning, you likely have a failed capacitor. The capacitor acts like a large battery that delivers the initial jolt of power to start the fan and compressor. It is a high-wear part that must be replaced by a professional.
- Repeatedly Tripping Breakers: As mentioned earlier, if your AC breaker trips immediately after a single reset, there is a severe electrical fault within the system.
- Burning Odours or Sparks: A strong, pungent smell of burning plastic or ozone indicates overheating electrical wiring or a failing motor winding. Turn off the breaker immediately.
- Hissing or Bubbling Noises: A persistent hissing sound near your indoor coil or outdoor refrigerant lines points to a high-pressure refrigerant leak.
Frequently Asked Questions About AC Troubleshooting
Why is my AC running but not cooling the house?
If your system is running and blowing air, but your home remains warm, the most common culprit is a severe restriction in airflow. Check your air filter first; a completely clogged filter will prevent your system from circulating enough air to cool the home.
Other common causes include a dirty outdoor condenser coil that cannot shed heat, or a low refrigerant level due to a leak. Start by replacing your filter, cleaning around your outdoor unit, and ensuring all indoor vents are open. If these steps do not help, your system may have a refrigerant issue that requires professional diagnosis.
How often should I replace my air filter in Hamilton?
While standard manufacturer advice often suggests replacing filters every 90 days, our local climate in Southern Ontario requires a more proactive approach. During the peak summer cooling season, we recommend checking your air filter every 30 days.
If you live in a high-traffic area, have pets that shed dander, suffer from seasonal allergies, or if you live near active construction zones in expanding Hamilton suburbs, your filter will load up with debris much faster. Checking it monthly ensures you catch a clog before it starves your system of air.
What unusual noises or smells indicate a serious problem?
Your air conditioner should operate with a gentle, steady hum. If you hear loud screeching, squealing, or metal-on-metal grinding, your blower motor bearings are likely failing. A loud clanging or banging indicates a loose component inside the blower wheel or compressor housing.
In terms of smells, a musty, damp odor usually points to standing water in a clogged drain pan or mold growth on the evaporator coil. A sharp, chemical, or burning electrical smell indicates a wiring failure. If you experience any of these sounds or smells, shut down your system immediately to prevent further mechanical damage.
Conclusion
Taking the time to perform basic ac troubleshooting before calling a pro is a smart way to rule out simple, everyday glitches before paying for a professional diagnostic visit. By checking your thermostat settings, verifying your circuit breakers, replacing dirty air filters, and keeping your outdoor unit clear of debris, you can resolve the majority of common summer cooling complaints entirely on your own.
However, when DIY troubleshooting reaches its limits, you do not have to sweat it out alone. B & G Heating Air Conditioning & Ventilation is a trusted, family-owned HVAC company serving Hamilton, Burlington, Oakville, Stoney Creek, Ancaster, and the surrounding areas. We pride ourselves on delivering expert cooling repairs, reliable maintenance, and quality workmanship focused entirely on your home comfort.
If your system is still refusing to cool after running through these checks, or if you want to ensure your air conditioner is fully prepared to handle the peak summer humidity, we are here to help. Explore our professional cooling services and products or give us a call today to schedule a professional tune-up with our friendly, licensed technicians.