


What to Do When Your Frozen Evaporator Coil Stops Your AC Cold
If you’re dealing with a frozen evaporator coil, what causes it and what to do about it are the two most urgent questions — and the short answers are: restricted airflow or low refrigerant causes it, and you need to shut the system off immediately.
Quick Answer: Frozen Evaporator Coil Causes and What to Do
Common Causes:
- Clogged or dirty air filter blocking airflow
- Closed or blocked supply and return vents
- Dirty evaporator coil reducing heat transfer
- Low refrigerant charge due to a leak
- Failing blower motor or slipping fan belt
- Malfunctioning thermostat running the system too long
- Operating the AC when outdoor temperatures are below 60°F
What to Do Right Now:
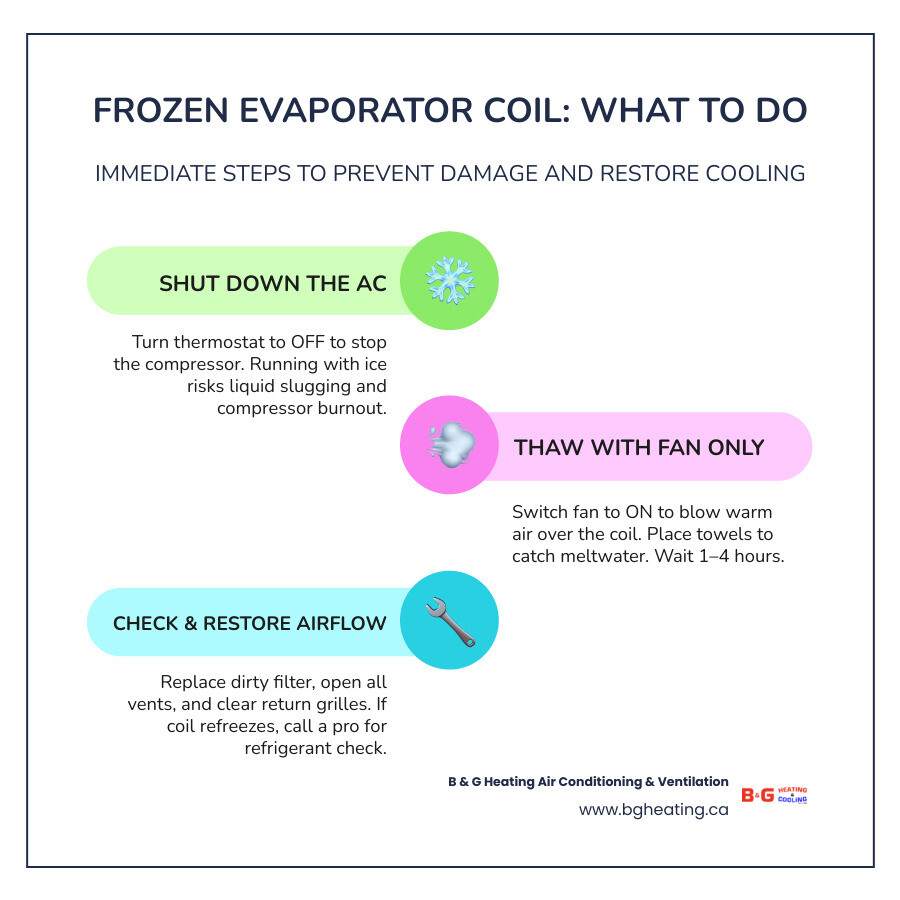
- Turn the thermostat to OFF to stop the cooling cycle
- Switch the fan setting to ON to circulate warm air over the coil
- Place towels around the indoor unit to catch meltwater
- Wait 1 to 4 hours for the ice to melt completely
- Replace the air filter if it is gray, clogged, or overdue
- Open all supply vents and clear return air grilles
- Call a licensed HVAC technician if the coil refreezes or if the filter was clean
Here in Hamilton, a frozen AC coil is one of the most common summer service calls — and one of the most misunderstood. Your air conditioner feels like it should be working harder when it’s icing up, but the opposite is true. Ice on the evaporator coil means heat transfer has broken down, and the system is no longer cooling your home at all. Worse, every minute the compressor keeps running against a frozen coil puts one of the most expensive components in your system at serious risk of permanent damage.
The good news is that most freeze events start with something simple — a dirty filter, a blocked vent, or a system that hasn’t been serviced in a while. The bad news is that ignoring it, or trying to chip the ice off yourself, can turn a straightforward fix into a costly repair. This guide walks you through exactly what’s happening inside your system, how to safely recover from a freeze, and how to stop it from happening again.
Frozen evaporator coil what causes it and what to do word list:
- AC keeps turning on and off: what’s wrong?
- AC not keeping up with humidity in a Southern Ontario summer
- Circuit breaker tripping when AC turns on: what to do
Frozen Evaporator Coil: What Causes It and What to Do
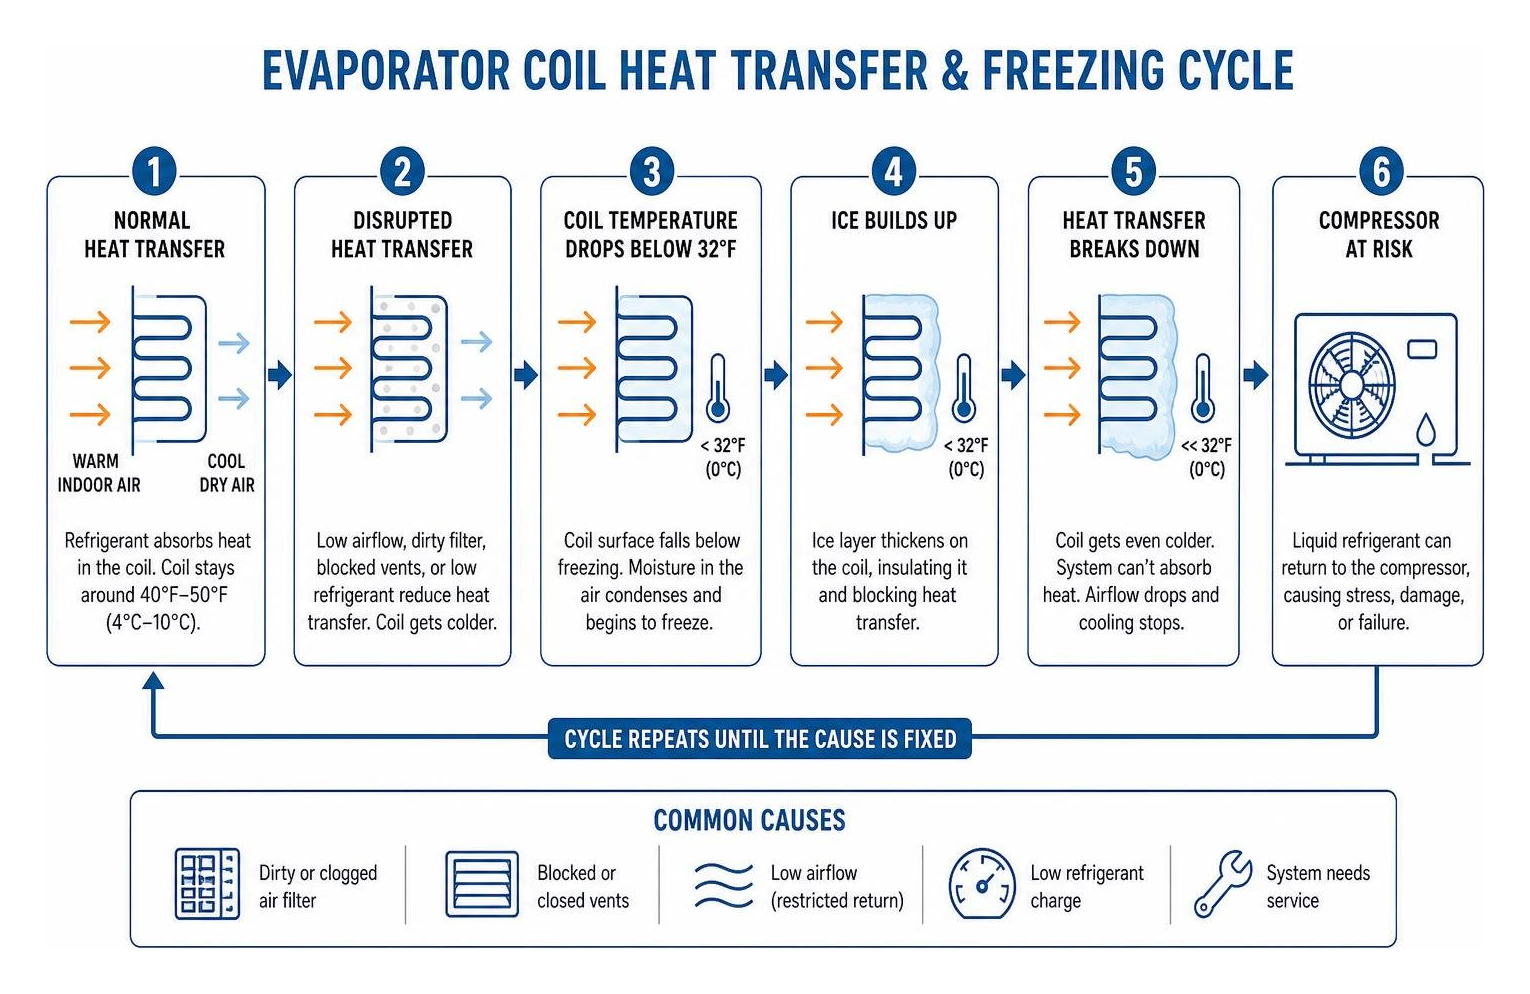
At its core, your air conditioner does not actually “create” cold air. Instead, it works by extracting heat from the air inside your home and transferring it outdoors. This thermodynamic process relies on the indoor evaporator coil. Under normal operating conditions, the liquid refrigerant inside the coil evaporates as it absorbs heat from your warm indoor air, turning into a gas.
Normally, this process keeps the evaporator coil operating at a cool but safe temperature of 40°F to 50°F (about 4°C to 10°C). This temperature is typically 18 to 22 degrees Fahrenheit below the temperature of the return air entering the system. However, if anything disrupts this delicate balance of heat transfer, the temperature of the coil surface will rapidly drop below the critical threshold of 32°F (0°C).
When this happens, the natural humidity in your indoor air condenses on the cold metal and immediately freezes. As a thin layer of ice forms, it acts as an insulator, further blocking heat transfer and causing the coil temperature to drop even lower. This creates a rapid snowball effect, turning your evaporator coil into a solid block of ice. If you are noticing weak airflow or warm air coming from your vents on a hot summer day in Burlington or Oakville, you may need to start Troubleshooting Frozen AC Unit issues before permanent damage occurs.
Understanding a Frozen Evaporator Coil: What Causes It and What to Do First
If you suspect your system is icing up, your very first action must be to shut the air conditioner down immediately. Many homeowners make the mistake of lowering the thermostat setting even further, hoping to force the system to cool. This is the worst thing you can do.
Running an air conditioner with a frozen evaporator coil forces the compressor to work under extreme stress. Because the frozen coil cannot transfer heat, the refrigerant remains in a liquid state instead of evaporating into a gas. This liquid refrigerant travels back down the suction line to the outdoor compressor.
Because liquid cannot be compressed, this leads to a catastrophic condition known as “liquid slugging.” Liquid slugging can shatter the compressor’s internal valves, destroy the pistons, and burn out the motor within minutes. Since the compressor is the heart of your AC and one of the most expensive components to replace, immediate shutdown is your best line of defense. For a detailed breakdown of these critical first steps, read our guide on How to Handle Your Air Conditioner When It’s Frozen.
Airflow Restrictions and Clogged Filters
Restricted airflow is the single most common cause of a frozen evaporator coil, accounting for nearly half of all service calls. Without a steady, robust stream of warm indoor air passing over the coil, there is simply not enough heat for the refrigerant to absorb.
This airflow starvation can be caused by several issues:
- Clogged Air Filters: A heavily dusty air filter acts as a physical barrier. As static pressure rises, air velocity drops, preventing warm air from reaching the coil.
- Closed or Blocked Vents: Closing more than 20% to 30% of the supply registers in your home to “save energy” actually backfires. It creates excessive static pressure, starves the system of airflow, and triggers a freeze. Similarly, placing large furniture directly in front of return air grilles will choke the system.
- Failing Blower Motor: If the indoor blower fan motor is failing, running at a reduced speed, or has a slipping belt, it cannot push enough air across the coil.
- Dirty Blower Blades: Over time, dirt can accumulate on the curved blades of the blower wheel, severely reducing its aerodynamic efficiency.
Keeping your filtration system clear is essential to preventing these issues. Learn more about managing these common bottlenecks in our article on Common AC Filter Problems and Solutions.
Refrigerant Leaks and Low System Pressure
The second primary culprit behind a frozen coil is a low refrigerant charge, which is always the result of a system leak or an improper installation charge.
From a physics standpoint, a lower volume of refrigerant inside the system causes a drop in pressure within the evaporator coil. According to thermodynamic laws, as pressure drops, the boiling point of the refrigerant also drops. This causes the refrigerant to expand and run much colder than designed—frequently plunging well below 32°F. As moisture from your household air passes over this super-chilled coil, it freezes instantly.
In older systems, pinhole leaks can develop due to formicary corrosion—a chemical reaction caused by modern household volatile organic compounds (VOCs) and formaldehyde off-gassing that slowly eats away at copper tubing. If your system is low on refrigerant, it will continue to freeze up immediately after thawing until the leak is professionally located, repaired, and the system is recharged. For more insights on seasonal refrigerant issues, check out our guide on Common AC Problems in Summer.
How to Safely Thaw and Dry Your Frozen AC System

Once you have turned off the cooling mode at your thermostat, you must allow the system to thaw completely. It is vital to handle this process safely to prevent secondary damage to your home and your HVAC equipment.
Step-by-Step Safe Thawing Procedure
Thawing a frozen evaporator coil requires patience and careful water management. Depending on the thickness of the ice, a complete thaw typically takes anywhere from 1 to 4 hours, though a severely iced-over system can sometimes take up to 24 hours.
Follow this safe recovery sequence:
- Turn Off the Cooling: Switch your thermostat setting from “Cool” to “Off”. This cuts power to the outdoor compressor, stopping the freezing process.
- Turn On the Fan: Switch the fan setting from “Auto” to “On”. This keeps the indoor blower fan running continuously, forcing warm ambient room-temperature air over the frozen coil to accelerate the melting process naturally.
- Prepare for Water Runoff: A fully frozen coil can hold between one and two gallons of ice. As this ice melts rapidly, it can overwhelm your condensate drain pan. Place old towels around the base of your indoor air handler or furnace. If your unit is located in an attic or upper closet, monitor the secondary drain pan closely to prevent water from overflowing and damaging your ceiling drywall.
- Check for Clogs: Ensure your drain line is flowing freely. If you notice water pooling around the unit, you may be dealing with a blockage. Learn how to address these drainage issues in our guide on AC Condensate Drain Line Clogs.
Proper Methods to Dry the Coil After Thawing
Once the ice has completely melted, you must ensure the evaporator coil and the surrounding cabinet are thoroughly dry before attempting to restart the cooling cycle. Leaving the coil wet can lead to instant refreezing upon startup, and standing moisture inside the dark cabinet can encourage mold and biological growth.
The safest and most effective way to dry the coil is to leave the system’s blower fan running on the “On” setting for at least 30 to 60 minutes after the last traces of ice have disappeared.
A Note on External Heat Sources: While some online guides suggest using a hair dryer or heat gun to speed up the defrosting process, we strongly advise against this. Evaporator coils are made of delicate aluminum fins wrapped around copper or aluminum tubing. Applying rapid, concentrated heat can cause severe thermal shock, warping the fins or cracking the refrigerant joints. If you must use a hair dryer, use it only on a strictly cool or low-heat setting, and keep the nozzle at least six inches away from the metal components at all times. Never attempt to use open flames, space heaters, or hot water, as these carry a high risk of permanent system damage.
Airflow vs. Refrigerant: Diagnosing Your Frozen Evaporator Coil
Differentiating between an airflow-related freeze and a refrigerant-related freeze is key to executing the correct repair.
| Diagnostic Indicator | Airflow Restriction Issues | Refrigerant Leak / Low Charge |
|---|---|---|
| Frost / Ice Pattern | Uniform ice coverage across the entire coil face | Frost starting specifically at the inlet of the coil or expansion valve |
| Airflow Strength | Severely weak or non-existent airflow from supply registers | Normal to slightly reduced airflow, but blowing warm air |
| Filter Condition | Gray, heavily clogged, or buckled air filter | Clean or recently replaced air filter |
| Suction Line Temp | Cold and wet, but not necessarily iced outdoors | Frozen copper line stretching all the way to the outdoor unit |
| System Behavior | Quiet or struggling blower motor; high static pressure | Compressor running constantly; TXV hunting or low-pressure switch trips |
Identifying Airflow Issues
If your diagnostic steps point toward an airflow problem, start with the easiest fixes. Check your air filter immediately. If you cannot see light through the filter when holding it up to a light source, it must be replaced.
Next, walk through your home in Hamilton, Stoney Creek, or Ancaster and verify that all supply registers are fully open and completely unobstructed by drapes, rugs, or furniture. Inspect your return air grilles to ensure they are free of dust buildup.
If the filter is clean and the vents are open, look closely at your blower motor. A heavy layer of dirt on the blower wheel blades can reduce air delivery by up to 30%. If the fan motor hums but does not spin, or if a belt-drive fan has a loose or broken belt, professional service is required to restore proper air velocity.
Spotting Refrigerant Problems
If your airflow components are in perfect condition but the coil continues to freeze, the issue is likely rooted in the refrigerant circuit.
When a system is low on charge, frost typically starts forming at the inlet of the evaporator coil where the liquid refrigerant first expands. You may also notice a hissing or bubbling sound coming from the refrigerant lines, which indicates gas bubbles in the liquid line.
Another common mechanical culprit is a malfunctioning Thermostatic Expansion Valve (TXV). The TXV regulates the flow of refrigerant into the coil. If the TXV bulb loses thermal contact or the valve becomes restricted, it can “starve” the evaporator coil, dropping pressure and causing a freeze. Conversely, a stuck-open valve can flood the coil, leading to erratic superheat readings and compressor damage. Diagnosing these complex refrigerant dynamics requires specialized diagnostic manifolds and electronic leak detectors.
Preventing a Frozen Evaporator Coil: What Causes It and What to Do for Long-Term Maintenance
Preventative care is the single most effective way to protect your air conditioner from freezing up. By taking a proactive approach, you can ensure system longevity, maintain peak energy efficiency, and enjoy uninterrupted comfort. Discover the full advantages of routine care in our article on the Benefits of Preventive AC Maintenance.
Routine Homeowner Maintenance Tasks
As a homeowner, there are several simple tasks you can perform to keep your system running smoothly:
- Change Filters Regularly: Replace your standard 1-inch pleated filters every 30 to 90 days. During peak summer cooling months in Southern Ontario, check the filter monthly. If you have pets or allergy sufferers in your home, more frequent changes are required.
- Keep Vents Unobstructed: Never close more than one or two registers in your home, and ensure return vents have at least 12 inches of clear space around them.
- Maintain Outdoor Clearance: Keep grass, weeds, and shrubs trimmed back at least two feet from your outdoor condenser unit to ensure unrestricted heat rejection.
- Avoid Extreme Thermostat Settings: Avoid setting your thermostat below 68°F (20°C). Running your system continuously in an attempt to achieve extreme indoor temperatures increases the risk of coil freezing, especially during cooler overnight periods.
Professional AC Tune-Ups and Inspections
While homeowner maintenance is vital, certain technical tasks must be left to licensed professionals. Annual professional maintenance is essential for keeping your system’s internal components clean and operating within manufacturer specifications.
During a professional tune-up, a qualified technician will:
- Clean the Evaporator Coil: Dust and biological growth on the coil fins act as an insulating blanket, reducing heat transfer and causing freezes. A professional cleaning removes this buildup safely using specialized, non-rinse chemical cleaners.
- Verify Refrigerant Charge: Technicians use calibrated digital manifolds to measure superheat and subcooling, ensuring your system has the exact charge required for optimal pressure.
- Inspect Electrical and Mechanical Components: Checking blower motor amperage, testing run capacitors, and verifying thermostat calibration catches minor component wear before it leads to a system freeze.
For a comprehensive checklist of what a professional inspection entails, read our complete guide on How to Do an AC Tune-Up: A Complete Guide.
Frequently Asked Questions About Frozen AC Coils
Can a frozen evaporator coil damage the compressor?
Yes, absolutely. Running an air conditioner with a frozen evaporator coil is one of the leading causes of premature compressor failure. Because the ice prevents the refrigerant from absorbing heat and evaporating, liquid refrigerant travels back down the suction line to the compressor.
Since compressors are designed strictly to compress gas, this liquid refrigerant washes away the compressor’s lubricating oil and causes severe mechanical damage (liquid slugging). This can lead to broken internal valves, seized bearings, and complete compressor burnout, which often requires a full system replacement.
How long does it typically take for an evaporator coil to thaw?
In most residential systems, a frozen evaporator coil will thaw completely within 1 to 4 hours if you turn the cooling mode off and run the indoor blower fan continuously on the “On” setting.
If you turn the system completely off without running the fan, thawing can take anywhere from 2 to 6 hours. For severe, solid blocks of ice that have spread to the outdoor refrigerant lines, it can take up to 24 hours to melt completely. Never attempt to restart the cooling cycle until you are certain all ice has melted.
When should I call a professional HVAC technician instead of attempting a DIY fix?
While you can easily resolve simple airflow issues yourself—such as replacing a dirty air filter or opening blocked vents—you should call a professional technician if:
- The evaporator coil freezes again shortly after you have completely thawed it and replaced the air filter.
- You suspect a refrigerant leak (indicated by hissing sounds, ice forming on the copper lines, or poor cooling despite normal airflow).
- The indoor blower fan is not running, runs slowly, or makes unusual squealing or grinding noises.
- You notice water pooling around the indoor unit that does not drain after clearing the immediate pan area.
- Your system uses legacy R-22 refrigerant, which requires specialized handling and reclaimed stock under environmental regulations.
Conclusion
A frozen evaporator coil is a serious warning sign that your air conditioning system is struggling. Whether the root cause is a simple restricted filter or a complex refrigerant leak, taking immediate action to shut down the system and melt the ice safely is the best way to protect your investment and avoid costly compressor damage.
At B & G Heating Air Conditioning & Ventilation, we have been providing trusted, family-owned HVAC services to homeowners across Hamilton, Burlington, Oakville, Stoney Creek, Dundas, and the surrounding communities for years. Our team of fully licensed, factory-trained technicians is ready to help you diagnose the root cause of your system’s freezing issues and restore reliable, efficient comfort to your home.
If your air conditioner is struggling to keep up with the summer heat, don’t wait for a minor issue to turn into a major breakdown. Contact us today to Schedule AC Service in Hamilton and let our family keep your family cool.